At this age, it is important that children achieve proper crayon handling in order to improve fine motor skills. One was of achieving this goal is simply by giving the child blank papers and colours so that they can colour without boundaries, gaining practice in handling the colour while stimulating their creativity.

Activity 2

Children in the class are exposed to play-dough, which is home-made. With play-dough, children improve hand movement, enhance fine-motor skills and enjoy being creative. It's different from plasticine since it's softer, easier to handle and less messy!
Here is an easy recipe that we use. The most difficult ingredient to find is the cream of tartar. However, most leading supermarkets have it. Some people substitute cream of tartar for lemon drops.
Ingredients
- 1 cup flour
- ½ cup salt
- 2 tsps cream of tartar (or 1/4 tsp of lemon juice)
- 1 cup water
- 1 tbsp oil
- Food coloring
Method:
First, combine flour, salt and cream of tartar in a saucepan. Mix liquids and gradually stir them into the dry ingredients. When the mixture is smooth, cook over medium heat, stirring constantly until a ball forms. Remove from heat and knead until smooth. Store in a closed bag or stretch and seal.

The Learning benefits from the use of playdough:
- Self-expression
- Imagination and creativity
- Building and strengthening fine motor skills
- Eye and hand coordination
- Problem solving – using play dough to join parts together
- Social interactions
These Tin Can Music Shakers are a simple homemade musical instrument to make and you will find most of the materials around the home. We play a lot of music in our home and the Tin Can Music Makers were so much fun and a great addition to our creative play.
What you will need?
You will need coloured paper, clean recycled tin cans, balloons, scissors, glue, stickers and rice or other fillings for the shaker. We also used coconut shavings, dried split peas and uncooked pasta to create different sounds such as soft and loud. My girls had fun trying to pick which item was making that sound when they shook the tin.
Learning experiences from making a homemade Tin Can Music Makers:- Develop a sense of pride and achievement.
- Encourages and promotes imaginative play and creativity.
- Fine motor development and eye-hand coordination.
- Getting little bodies moving through dance and rhythm.
- Fun!
Activity 4
Do-It-Yourself Recycled CrayonsMAKE SURE THAT THE CRAYONS ARE WAX NOT PLASTIC, LIKE THE ONES
Practice fine motor and one-to-one correspondence skills by placing a paper cupcake liner in each section of a muffin tin. (Or, if you want funkier shaped crayons, try using some silicon baking trays.)
Use the pincer grasp to place all the peeled crayon bits into muffin tins, sorting them by complimentary or contrasting colors. Add a bit of color-mixing theory to the activity by discussing what the resulting crayon colors might be -- avoiding mixes that will make dull grays and browns! (If you wish, for extra tactile input, sprinkle glitter into the cups. Pop the tray into an oven, pre-heated to 150 degrees F, for 15-20 minutes. Leave the oven light on for eager eyes to witness and be sure to take the tray out when the crayon pieces seem just melted, but not bubbly.
 Carefully have an adult remove the tray from the oven, showing it from a safe distance to eager young ones. You can take a toothpick to swirl the colors a bit if you wish before freezing the crayons, which can add a little more color mixing and visual interest to the activity.
Then, after taking advantage of the inherent science lesson on matter and how it changes from solid to liquid due to the heat of the oven, place the tray in the freezer.
WE USE IN THE CLASSROOM!- Activity 5
Making your own finger paint at home How to make finger paint at home - non toxic
Recipe:...- 3tbs sugar- 1/2 tbs salt- 1/2 cup corn starch- 2 cups of waterCombine ingredients in a small saucepan. Warm until mixture thickens. Cool & pour in containers. Add food coloring to create desired colors... ENJOY!!!!
Another easy way to make finger paint- non toxic!
Fill an ice cube tray with condensed milk and stir in some food colouring with a toothpick. Store in the fridge since it's condensed milk - and enjoy painting :)
Activity 6
How to Make Puffy Paint?There is something magical about Puffy Paint and it is a must try for any child or toddler to paint and play with. It is super easy to make with all the ingredients you need right in your pantry and after your child has finished painting, place it in the microwave for the magic to happen…….It is SO much FUN!! What you will need?
You will need self-raising flour, salt, food colourings, paint brushes, paint tray, measuring spoons, water and cut up pieces of cardboard. There are a number of recipes out there for puffy paint but I had a bit of an idea of what was included and had a play around with the main ingredients until I found the right consistency and quantity for our paint pots. Here is the recipe that I found to work well. Recipe for Puffy Paint 1 Tablespoon Self Raising Flour 1 Table Spoon Salt 3 Teaspoons Water Food Colouring Continually mix the ingredients with a paint brush until all ingredients have combined well into a paste.
We used thick cardboard that I cut up from an empty nappy box and also cut the cardboard into smaller sizes to fit into the microwave. My girls’ just painted one picture after the other until all the puffy paint and cardboard was gone! I would recommend that the paint be painted on thick so when they are cooked they are extra puffy!
When the paintings were all finished we placed a microwavable bowl in the centre of the microwave and put 1 painting at a time on top of the bowl. Different microwaves will require different times; this is something you will have to trial to see how long you need to cook the puffy paint to make it puff. Our microwave roughly took 25 seconds to puff the paint but I did stop at intervals to check that I was not overcooking the puffy paint. The puffy paintings should come out warm not hot, so keep an eye on the time to avoid over cooking. The learning benefits of this activity:- Encourages creativity and self-expression with paint
- Eye and hand coordination
- Fine motor development
- Experimenting and exploring with a new paint tool
- Sense of achievement and pride
- Colour recognition
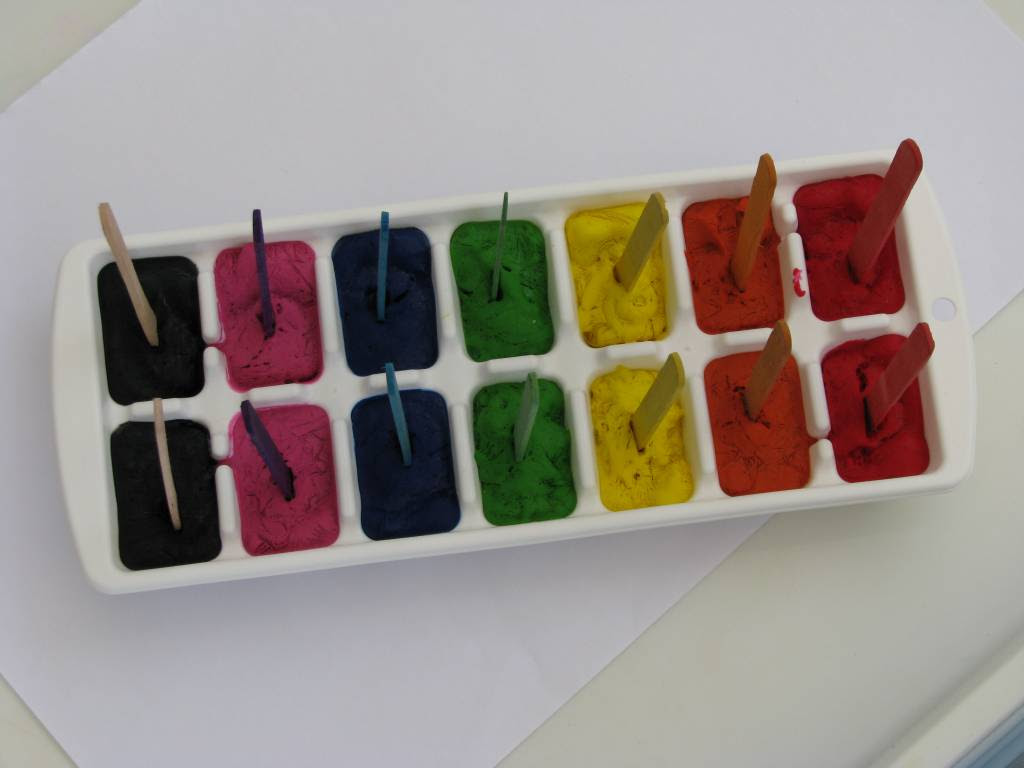
Activity 7Paint PopsThe great thing about the internet is that there many fabulous sites out there sharing so many wonderful play and craft ideas. This post has been developed on the fabulous idea Frozen Paint Art – Cool Fun on a Hot Day I found on the gorgeous blog Mom to 2 Posh Lil Divas. It looked like so much fun that we had to give it a try. My girls renamed this to Paint Pops and had a blast painting with melting ice paint! What you will need?
You will need paint, ice cube tray, pop sticks, paper and a divided paint tray. We froze the paint a little then took them out the freezer to place in the pop sticks. When we were ready to use the frozen paint pops we placed them in the sun for little to slightly melt them and remove them from the tray.
Some of the paint pop creations made by Miss 4 and 5; a garden of flowers and a boat on the sea. Miss 4 loved to just mix the colours together on the paper, making new colours.
Making patterns and swirls with the paint pops! These will make great wrapping paper for Nanny’s birthday present! Learning links with this activity:
- Self-expression with paint
- Eye and hand coordination
- Fine motor development
- Experimenting and exploring with a new paint tool
-
Sense of achievement and pride
Activity 8
Ghost ToastLooking for a treat that truly embodies the spirit of Halloween? Try serving some of these flavourful phantoms.Ingredients- White Bread (1 slice per ghost)
- Whipped cream cheese
- Currants
Instructions1. For each, toast a slice of white bread and then cut a ghost shape from it. You can do this freehand using a knife, or you can use a gingerbread-girl cookie cutter.2. When the cut outs have cooled, SPREADon a generous coating of whipped cream cheese.
3. For eyes and mouths, add currantsActivity 9EGG-CARTON SPIDER HALLOWEEN CRAFT
Supplies:
- Egg carton (preferably cardboard)
- Black or purple paint or marker
- Three pipe cleaners
- Googlie eyes
STEP ONE: Cut one of the 12 bottom pieces of your egg carton out. Paint or color it the color of your choice.
STEP TWO: Cut the three pipe cleaners into thirds, making a total of 9 pieces. You can discard one as you only need eight legs for a spider. Pierce eight holes near the bottom of your egg holder around the spider body. I used a scrapbooking paper piercer to do this. Then insert the pipe cleaners into each hole. My daughter was able to do that part herself once I had pierced the holes.STEP THREE: Using a small amount of glue, glue on googlie eyes and your spider is DONE! We actually pierced an additional hole through the top and strung string through it (tying a knot on the inside of the holder to hold it) so we could hang the spiders from above. I didn’t get a picture of that yet though!


No comments:
Post a Comment